Monday 19 November 2012

CRUSTLESS PUMPKIN "PIE"


Hello!  Just in case the title of this blog recipe post has thrown you off, Yes! a crustless Pumpkin "Pie" can be made and it tastes great!  So I am one of those people who likes Pumpkin Pie. I like the flavour, creaminess, and cinnamony taste of it.  It reminds me of when I was growing up and my mom making it for our family on Thanksgiving.  It also reminds me of my Dad.  He liked this crustless version and called it "Pumpkin Pudding".  It is just a tasty wonderful dessert, especially in the fall.  Although as I have previously stated that I like Pumpkin pie, I am not always so excited about the calories associated with the crust.  So to cut down on some of the calories of this dessert, I sometimes like to swap the crust out in favour of topping the Pumpkin Pie with whipped cream.  Because you just simply can't  (insert grin here) have Pumpkin Pie without a little dollop of whipped cream.  This recipe is an adaptation from both my mom's and Libby's Pumpkin Pie recipe. 

Now let's get to baking that crustless Pumpkin "Pie".

The ingredients you will need are the following:


  • 2 Eggs, Slightly beaten
  • 1 1/2 cups Canned pumpkin
  • 3/4 Cup Sugar  (I used a little less)
  • 1 TSP Salt
  • 1 1/4 TSP Cinnamon
  • 1 2/3 cups Evaporated milk (I used Light Evaporated Milk)
  • Whipped Cream (Optional topping)

DIRECTIONS

1.  Preheat Oven to 425 degrees.

2.  In a large bowl, mix filling ingredients in order given.  Pour into 9 inch pie plate.


 3.  Bake in preheated hot oven (425 degrees) for 15 minutes.

4.  Reduce temperature to 350 degree and continue baking for 45 minutes or until knife inserted into center of pie filling comes out clean. 


5.  Allow to cool to room temperature, slice and serve.  Garnish pie with a dollop of whipped cream or vanilla ice cream, if desired.


Now please enjoy your lovely piece of Crustless Pumpkin "Pie"!   And to my American Family and Friends - Happy Thanksgiving later this week!


Friday 3 August 2012

BANANA BREAD


Recently, I was heading out of town with my mom to visit my brother, sister-in-law, and my cute nieces and nephews.  Since I did not want the bananas to go bad that were on the counter, I decided to make some banana bread to take with us. The recipe is slightly adapted from the one I found in a Betty Crocker cookbook.

Now let's get to baking!

These are the ingredients you will need to make this tasty Banana Bread:

  INGREDIENTS
  • 1 1/4 cups Sugar
  • 1/2 cup Butter
  • 2 Eggs
  • 1 1/2 Mashed Ripe Bananas (3-4 approximately)
  • 1/2 cup Milk
  • 1/2 TBSP Vinegar
  • 2 TSP Vanilla
  • 2 1/2 cups Flour
  • 1 TSP Baking Soda
  • 1 TSP Salt
  • OPTIONAL:  1 cup chopped walnuts
DIRECTIONS
1.  Pre-heat oven to 350 degrees.  Grease bottom only of loaf pan.

2.  In an electric mixer cream together butter and sugar.


3.  Add eggs, mashed bananas, milk mixture, and vanilla.  Blend together.  NOTE:  Pour vinegar in measuring cup and then add enough milk to make 1/2 cup.


4.  Add flour, baking soda, and salt.  Blend together until all ingredients are fully incorporated.  


5.  Pour batter into loaf pan and bake for 55 minutes or until golden brown and done in the center. Test centre with a knife or toothpick.  Banana bread is done when it comes out clean.


6.  Allow to cool for several minutes in the pan and then turn out on cooling rack to finish cooling.


7.  Slice and serve!  Wrap up any leftovers in plastic wrap or aluminum foil.  Banana Bread freezes well.
 

Enjoy! 


Thursday 14 June 2012

SPAGHETTI MEAT SAUCE


I enjoy Italian food dishes.  One of my favourites is spaghetti.  I personally like meat sauce on my spaghetti however this sauce can be used on your favourite pasta shape.  With the aid of a few "prepared" ingredients this is my recipe.  It is a fairly thick and chunky sauce - which is how I like it. Now let's get to cooking!

The following are the ingredients to make "Mandy's Spaghetti Meat Sauce":


INGREDIENTS
  • 1 lb ground lean beef
  • 1/2 onion, chopped
  • dried roasted or fresh garlic cloves, to taste
  • 1 stick of celery, finely chopped
  • 8 mushrooms, sliced 
  • 1/2 small zucchini, chopped into small pieces
  • 1 TBSP of Italian Seasoning or to taste 
  • 1 can of stewed tomatoes
  • 1 small can of tomato sauce
  • 1 jar of prepared spaghetti sauce
  • Optional:  1/4 - 1/2 cup water

Recipe Yield:  Approximately 6 servings

DIRECTIONS 

1.  In a deep pan and brown ground beef, onion, and garlic over medium heat until cooked. Turn up heat and stir constantly until meat is thoroughly cooked and onions are soft.  Drain excess grease.


2.  Add chopped celery, zucchini and sliced mushrooms until cooked and tender.


3.  Take a brief break from making the sauce and put a large pot of water on to boil and cook 6 servings of spaghetti noodles (or noodles of choice) according to directions on package.

4.  Add Italian Seasoning (to taste) to meat and vegetable mixture.  Pour in 1 can of stewed tomatoes, tomato sauce, and jar of prepared spaghetti sauce.  Note:  If the sauce is a bit too thick you can and if desired - stir in the water a little bit at a time until desired consistency is reached.


5.  Stir together and bring sauce to a boil stirring constantly to avoid burning it.  Remove from heat.


6.  Drain noodles and combine with meat sauce.  Serve immediately.  Pair with a side salad and/or garlic toast.  If desired, top with grated mozzarella or parmesan cheese.


Optional Recipe Variation: To make Baked Spaghetti, place spaghetti in oven and broiler safe dish and smother top with mozzarella cheese and put under broiler for a few minutes until cheese is melted and lightly browned.  Watch it carefully so it does not burn.

Enjoy your Spaghetti feast!

Friday 8 June 2012

CHEESE, MUSHROOM, SAUSAGE, & ONION OMELETTE


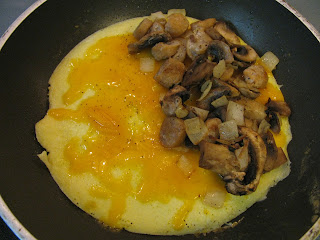
Hello again!  I really like omelettes.  They are my favourite menu item to order when I am in a restaurant for breakfast. Omelettes are so versatile.  You can have them for breakfast, lunch, or dinner.  When I make them it is usually for that night's dinner.  What is also good with omelettes is the vast array of fillings that one can put into one.  The fillings I chose for this blog entry are cheddar cheese, mushrooms, sausages and onions.  I have to give credit to my dad for giving me great tips and pointers many years ago on how to make delicious omelettes.  Thanks dad!  Now let's get to cooking.

The ingredients you will need to make this omelette are:


INGREDIENTS
  • 4 large eggs
  • yellow onion, chopped, to taste
  • 4 pork sausages, sliced
  • 5 white button mushrooms, sliced
  • Grated cheddar cheese, to taste
  • Salt and pepper, to taste
Recipe Yield:  2 omelettes

DIRECTIONS

1. Beat eggs in bowl. 


 2.  Pre-heat and coat large frying pan with oil or cooking spray.  Add onions and saute over low-medium heat until cooked.  Push to the side.  Add sliced sausages until browned and cooked.  Push to side of pan.  Add mushrooms and cook until soft and browned.  Remove from heat, cover (to retain heat) and set aside.


3. Coat a small frying pan with oil or cooking spray and preheat to low or medium heat.  Ladle half of the beaten eggs into pan.  Watch closely until eggs have cooked on the underside but are still a bit liquidy on top.  Then gently flip over to cook other side.  Be careful not to overcook eggs.


4.  Sprinkle half of the grated cheddar cheese onto eggs and allow to melt slightly.  Spoon half of remaining filling ingredients onto the eggs and allow cheese to melt more.  If desired cover frying pan to until cheese is fully melted.  Season to taste.  Using a flipper gently fold the omelette onto itself and place on plate.  Repeat steps with second omelette and serve immediately.


Some suggested side dishes include:  Sliced fruit, sliced tomatoes, hash browns, toast, bagel, English muffin, etc.

Recipe variations:   Some examples of other fillings you can use in omelettes are: cooked ham, cooked bacon, pepperoni, mozzarella cheese, monterrey jack cheese, feta cheese, tomatoes, green onion, red onion, salsa, green, yellow or red peppers. 

Enjoy!

Friday 1 June 2012

CHICKEN TACO SOUP


A few years ago, I was invited to a friend's place for dinner and she served this soup.  I had never had it before but I really liked it.  I have adapted the recipe she gave me and personalized it to better suit my tastes.  I hope you like it too.  Now let's get to cooking.

The ingredients you will need to make this soup are:


INGREDIENTS
 
  • 1 package of chicken breast fillets (tenders)
  • 1 1/2 cups mild salsa (or your favourite type)
  • 1 341 ml (11.53 fl oz) can of corn
  • 1 231 ml (7.8 fl oz) small can of tomato sauce
  • 1 398 ml (14 fl oz) can of diced tomatoes
  • 1 340 ml (11.49 oz) can of dark red kidney beans
  • 1 340 ml (19 fl oz) can of black beans
  • 1 packet of taco seasoning
  • 1 to 1 1/2 cups of hot water  (Note:  You may not need to use all of the water)

***Optional Recipe Variations:  Add small can of black olives, grated mozzarella cheese.

DIRECTIONS

1.  Place chicken fillets (tenders) in crock with salsa.  Stir.  Cook on low for 2.5 - 3 hours.  Check chicken at 2.5 hours to see if it is done.  If not turn temperature to high and finish cooking chicken.


2.  Once cooked shred chicken and stir with salsa until fully incorporated again.


3.  Rinse and drain corn, kidney beans, and black beans.  (I did this to remove excess salt and because I did not want an overly watery soup.  I like thicker soups).  Pour in the cans of corn, tomato sauce, diced tomatoes, kidney beans, black beans, and taco seasoning packet.  * If desired to thin out the soup add 1 - 1 1/2 cups of hot water.   Again you may not need all the water.  Gently stir in water until it is incorporated and you have reached the desired consistency.  Cook on high for one hour more.


4. Serve immediately and garnish with your favourite "Scoops" tortilla or corn chips, sour cream and grated cheddar cheese.  Refrigerate any leftovers.


Enjoy your soup!

http://passets-cdn.pinterest.com/images/about/buttons/pinterest-button.png http://passets-cdn.pinterest.com/images/about/buttons/big-p-button.png